About the LLM Console
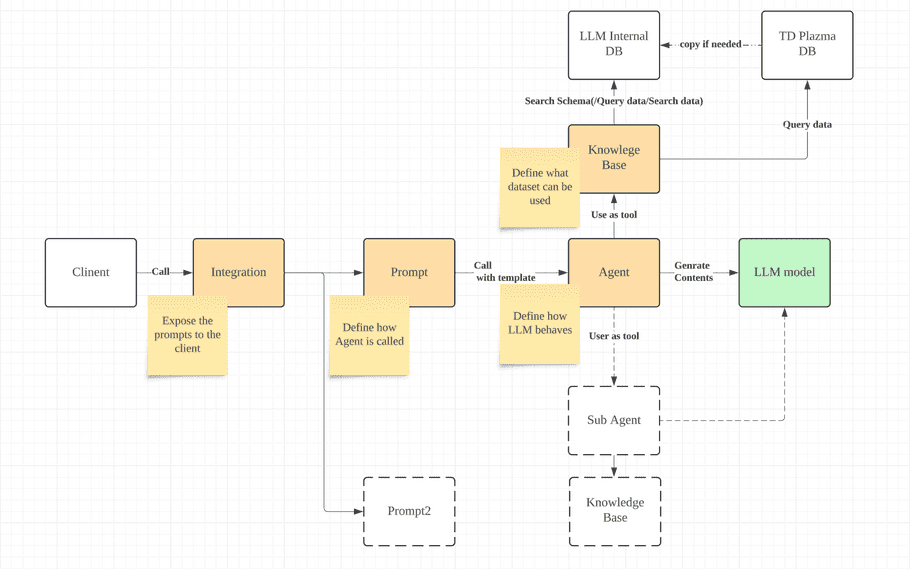
The Treasure Data AI Framework enables you to construct Retrieval Augmented Generation (RAG) utilizing data stored in the TD Plazma database. With AI Framework, you can generate content with a specific LLM model and use it inside and outside of the TD platform; for instance, you can call LLM from Google Spreadsheet, Gmail, Excel, Slack, etc. AI Framework supports some LLM models with details in the following sections. The following is a diagram of each model relationship. (It is not the system architecture; it is just an overview to describe the relationship.)
Supported LLM models
AI Franework supports the following LLM models:
- Claude 3.5 sonnet
- Caude 3 Sonnet (not supported in the Tokyo region)
- Claude 3 Haiku
Feature Activation
Contact your Customer Service Representative and request that the feature flag for the AI Framework be enabled.
Importing Data into TD
Data must be in Treasure Data to be accessible by the AI Framework. Review the following documentation:
LLM Console Application Access
Currently, the AI Framework is available as a separate app, outside of the TD Console.
-
URL for
US
region:
https://llm-console.treasuredata.com
-
The naming convention follows our standard naming of each region. For the Tokyo region, the URL will be
https://llm-console.treasuredata.co.jp
- Authentication: Authorization with the TD account you are logging in with. You will be redirected if you have a session in the specific TD account.
AI Framework Workflow
-
Prepare Data
- Prepare data on TD
-
Define Knowledge Base and Agent
- Log into AI Framework
- Define Knowledge Bases
- Define Agents
-
Use Agent
- Chat
-
Use from outside of TD
- Use via Slack
- Use via Webhook
Projects
You can quickly build an AI project that supports the creation of a retrieval-augmented generation (RAG). Think of your AI project as a folder for a parent segment that collects all AI assets (knowledge base, agent, system prompts, integrations, etc.).
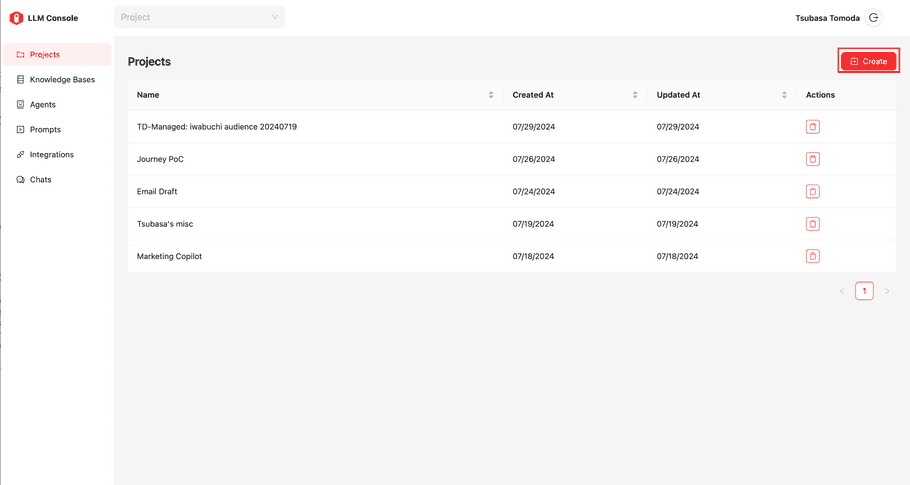
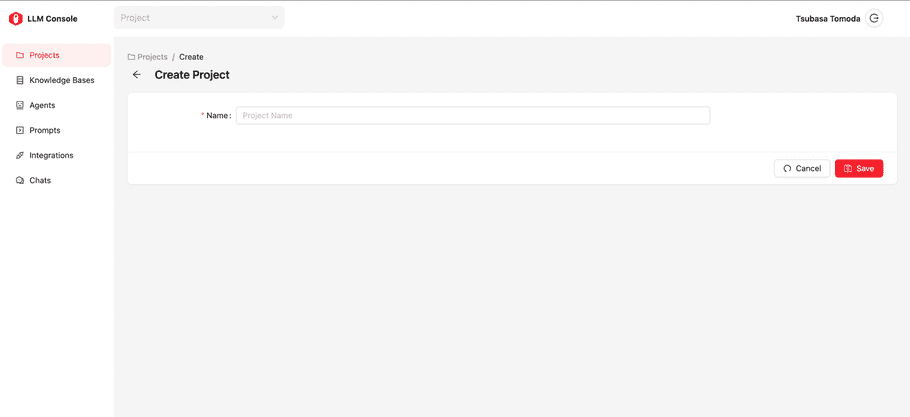
To create a new general project, select the Create button in the top-right in the Projects view.
Enter a name for your project. You cannot change the project name after you save it.
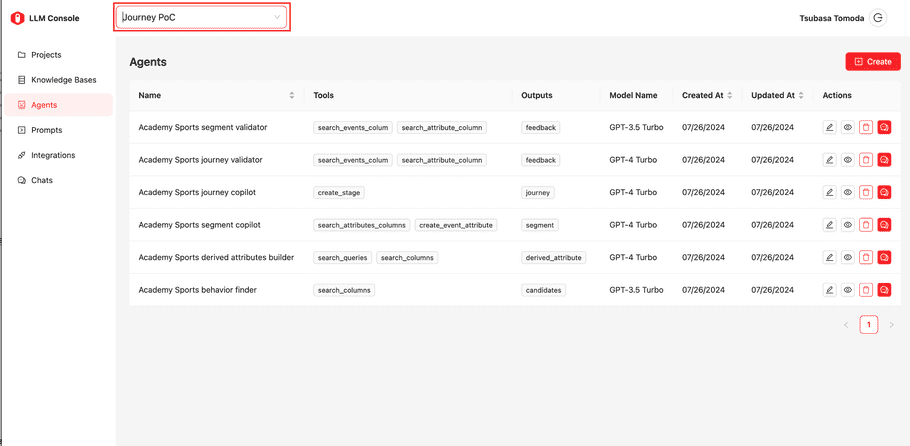
If there many projects, you can filter assets by project. In each asset view, you can see the dropdown type component on the top bar that has placeholder text “Project”. If you select a particular project name, the list assets will be filtered; only assets that belong to the selected project will be shown. Below are the examples of the agents view.
If the project is not selected, all agents will be shown in the list.
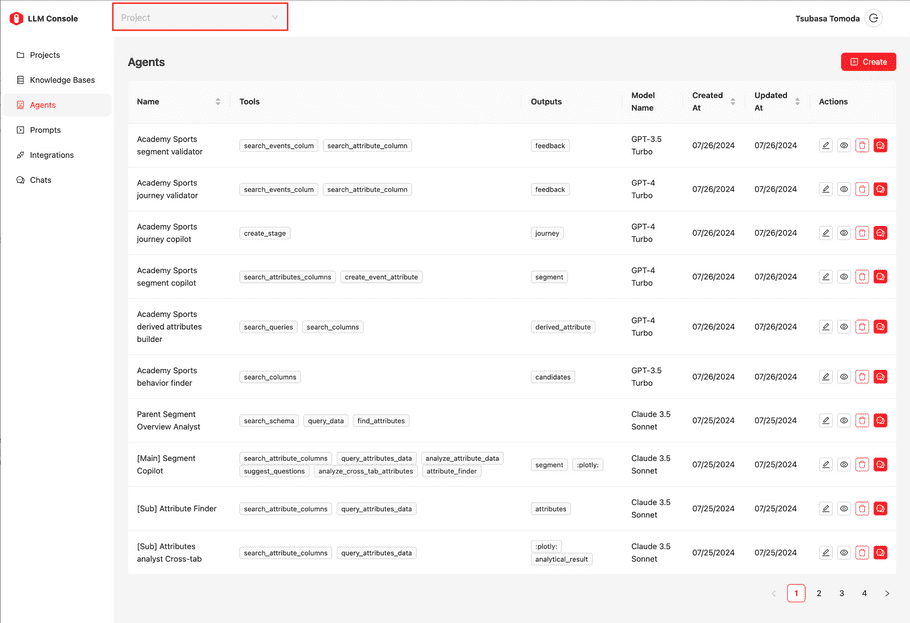
If a specific project is selected, the list is filtered.
Configuration
| Field Name | Sub Field Name | Description |
|---|---|---|
| Name | - | The name for the project |
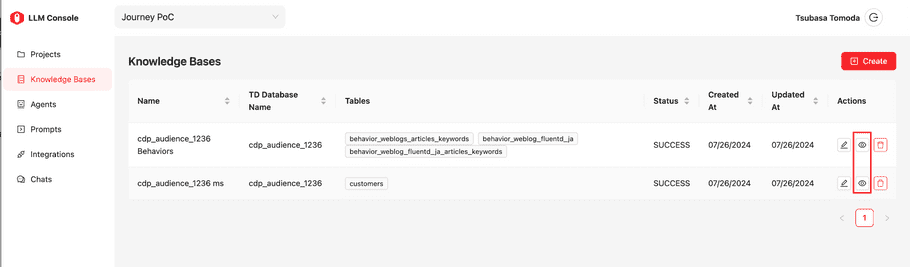
Knowledge Bases
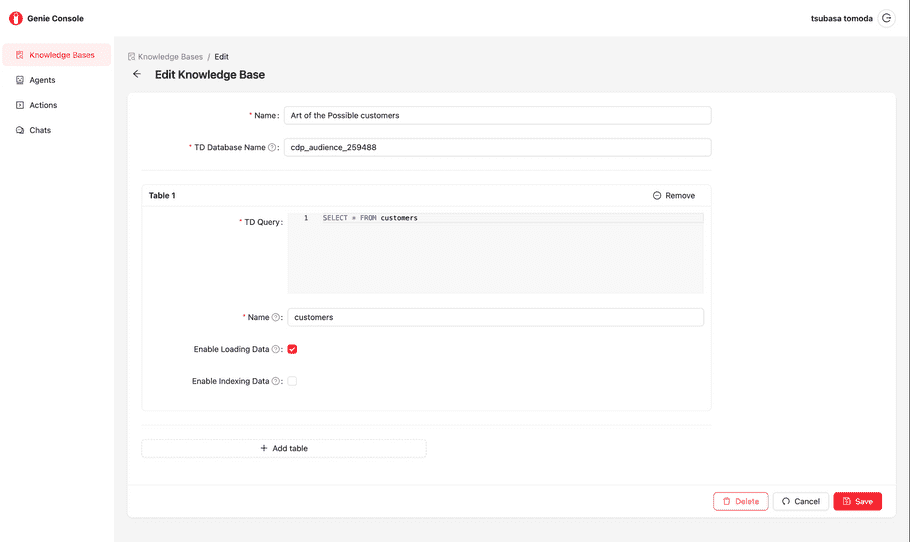
A knowledge base is an object that manages the dataset you want to use in the AI Framework. You need to write SQL to load the data from the Plazma DB. The easiest and simplest way is to use “select * from {table name}”, to set up all data as stored in Plazma DB. However, you can also write complex SQL to configure a knowledge base. A detailed configuration will be described in the following section.
Configuration
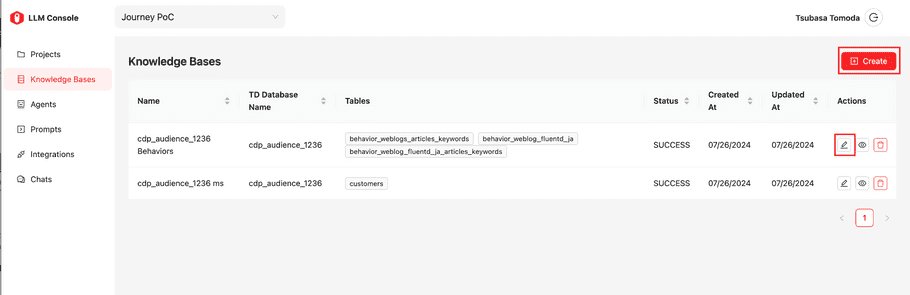
Select “Create” to create a new Knowledge Base or select the “pencil” icon next to each existing Knowlege Base to edit.
| Field Name | Sub Field Name | Description |
|---|---|---|
| Name | - | The name for this knowledge base |
| TD Database Name | - | Plazma DB Database name that stores the datasets you want to set up |
| Table (multiple) | - | You can define multiple table definitions |
| TD Query | Trino(Presto) SQL, which defines the data schema. Typical SQL would be “select * from {table name}”, but complex SQL can be written | |
| Name | The name of this table |
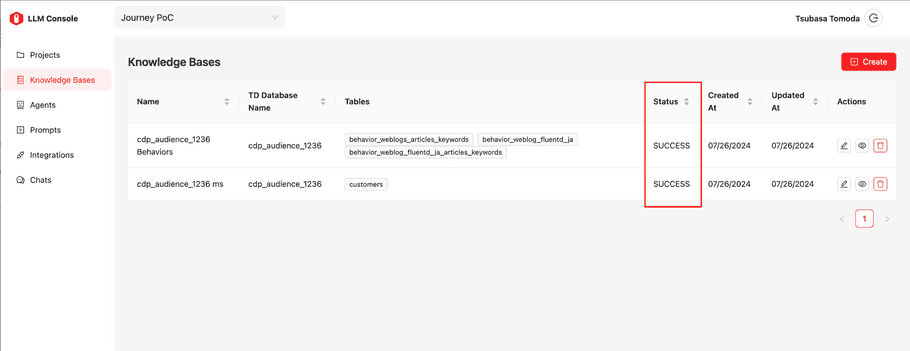
When you save the knowledge base, the data loading process will start. Once the status of knowledge base displays “Success”, the knowledge base is ready for use. You can check the status in the list page.
info
Enabling loading Data and Indexing Data is powerful; however, you might encounter performance issues. Currently, a better solution is to use an internal DB for search schema purposes and issue SQL to Plazma via Trino. If you need to do semantic data search, you need to turn them on. However, TD suggests keeping this feature turned off.
Query Simulation
You can check the setup of each existing knowledge base definition by selecting the “eye” icon.
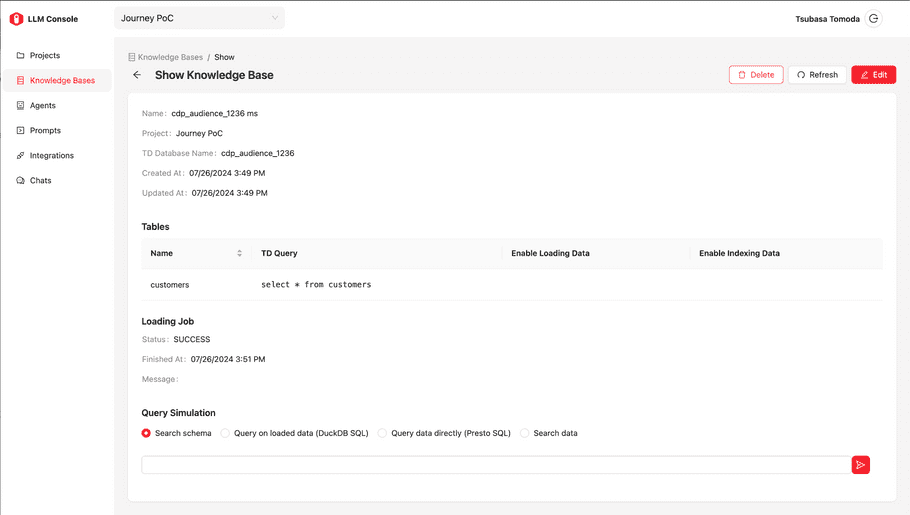
In the “Query Simulation” section, you can execute the following.
| Function Type | Description |
|---|---|
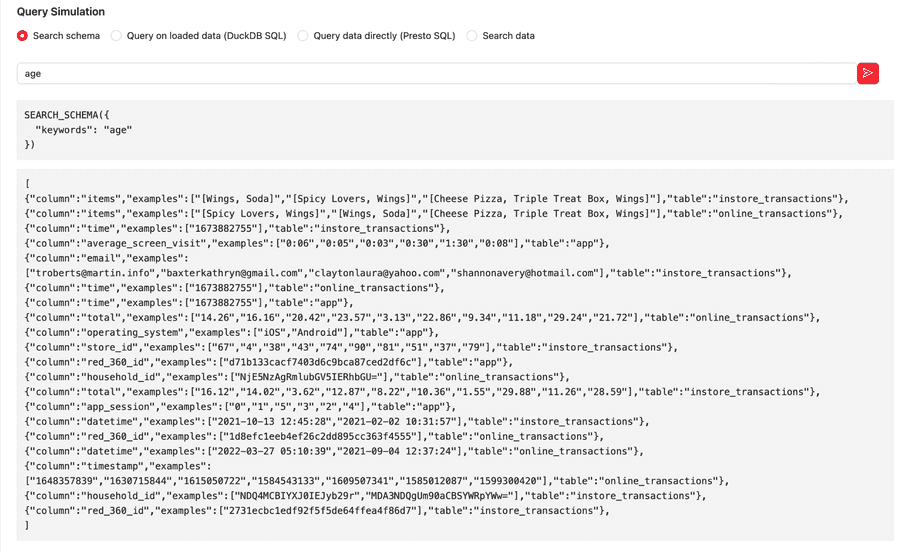
| Search schema | Semantic schema search against tables defined in this Knowledge Base. It returns the set of column name and its example values |
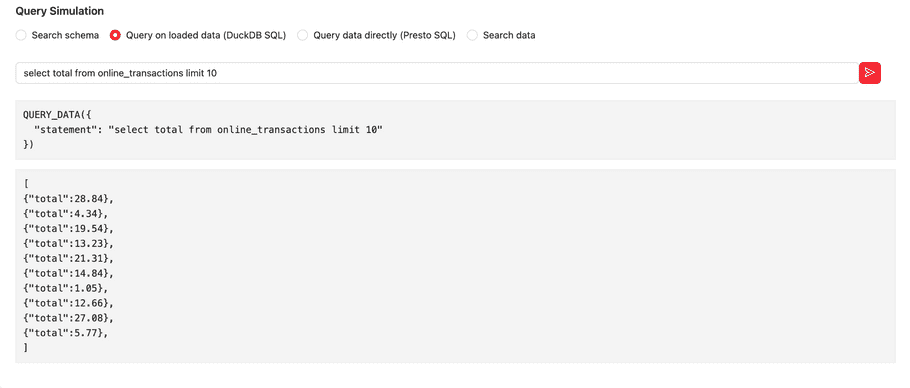
| Query data directly(Presto SQl) | Trino(Presto) SQL execution |
Screenshots below are examples for “Search schema” and “Query on loaded data (DuckDB SQL)”
Agents
Agents can configure assistance capabilities that help end-users with actions based on the necessary data, LLM model, and user input. An agent consists of System Prompts, Tools, and Outputs. The system prompt is the prompt that defines its behavior and characteristics. Tools are functionalities that the agent can use, and Outputs are functions that can be used for the output.
Agent Configuration
| Field Name | Description |
|---|---|
| Name | The name of this agent |
| Starter Message | The message will be shown at the very beginning of the chat. Usually, this is used for instructions for users |
| System Prompt | System prompt for this agent, define the role, how it should behave, etc… |
| Model Name | LLM model name that this agent uses |
| Max tool iterations | Maximum number of calls of tool for each user input |
| Temperature | The parameter for controlling the randomness. Higher value makes LLM models more creative, while lower value makes the LLM model more conservative (0 to 1). If you need more strictly generated content, this should be lower value, specifically 0 |
| Tools | The function that this agent can use. Searching/querying data for knowledge bases, and utilizing other agents. The detail is described in the later section |
| Outputs | The function that this agent can use for output The details are described in the later section |
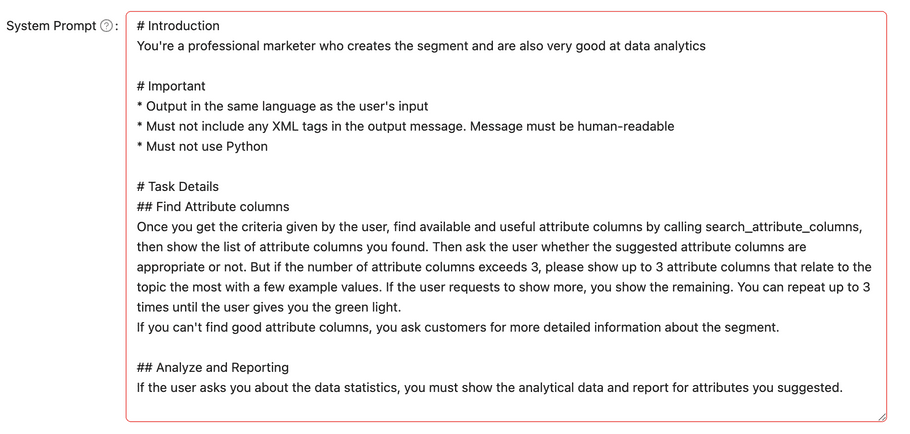
Writing System Prompts
A system prompt is the method in which you interact with the agent. Typically, you describe the role of the individual and also describe tasks. You can let the LLM model call functions defined by the tool and output functions by giving instructions like “call {tool function name} to do something.” The LLM model might try to call tools even though you don’t provide instructions. The LLM model refers to the function description of each tool to understand what it can be used for, so populating the function description of the tool is essential.
However, you must write a strict system prompt to avoid an LLM model that calls tools without instructions. Writing system prompts are a crucial part of developing the LLM-based model function. You must do trial and error to make an ideal agent.
The LLM model in the AI Framework doesn’t know anything; you have to guide and give it the necessary assets. A typical case is to aggregate some data (by running SQL), but the LLM model doesn’t know which tables are accessible and the schema of tables. You need this information for the LLM model or find a way to provide such information. Otherwise, the LLM model will generate SQL based on a hunch. One of the ways is to let it call schema_seach before contracting and executing SQL. Another way is to give actual Tables, their schema, and the relationship. If the LLM model still doesn’t generate good SQL, you must guide it by showing example code. Below is an example of declaring table schemas in the system prompt.
Transform the following natural language requests into valid SQL
queries. Assume a database with the following tables and columns exists:

Customers:
- cdp_customer_id (VARCHAR, PRIMARY KEY)
- email (VARCHAR)
- phone (VARCHAR)
- first_name (VARCHAR)
- last_name (VARCHAR)
- address (VARCHAR)
- city (VARCHAR)
- state (VARCHAR)
- zip (DOUBLE)
- gender (VARCHAR)
- education (VARCHAR)
- household_income (VARCHAR)
- next_best_meal (VARCHAR)
- vip_status (VARCHAR)
- td_interest_words (ARRAY of VARCHAR)

instore_transaction:
- time (int)
- cdp_customer_id (VARCHAR, FOREIGN KEY REFERENCES Customers)
- email (VARCHAR)
- total (DOUBLE)
- items (ARRAY of VARCHAR)
- store_id (LONG)

online_transaction
- time (int)
- cdp_customer_id (VARCHAR, FOREIGN KEY REFERENCES Customers)
- email (VARCHAR)
- total (DOUBLE)
- items (ARRAY of VARCHAR)
- store_id (LONG)
References
- Prompt Engineering Guide: https://www.promptingguide.ai/
- 26 prompting tricks to improve LLM models: https://www.superannotate.com/blog/llm-prompting-tricks
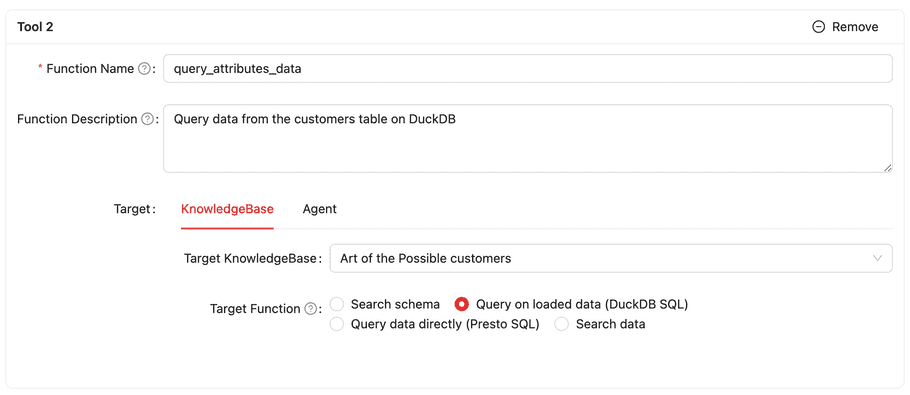
Defining Tools
| Field Name | Sub Field Name | Description |
|---|---|---|
| Function Name | The name that is referred from the agent (system prompt) | |
| Function Description | A detailed explanation of this tool | |
| Target | LLM model name that this agent uses | |
| Knowledge Base or Agent | ||
| Target: Knowledge Base | Select this if this tool uses a knowledge base | |
| Target Knowlege Base | Select the knowledge base from existing knowledge bases that this tool uses | |
| Target Function | Search schema / Query data directly(Trino(Presto) SQL). For more information, please refer to Query Simulation section. | |
| Target: Agent | Select this if this tool uses an agent | |
| Target Agent | Select the agent from existing agents that this tool uses | |
| Function | Only “Chat” for now | |
| Output Mode | Return or Show | |
| - | Return: Agent retrieves the output object from the agent | |
| - | Show: Agent shows the output from the agent | |
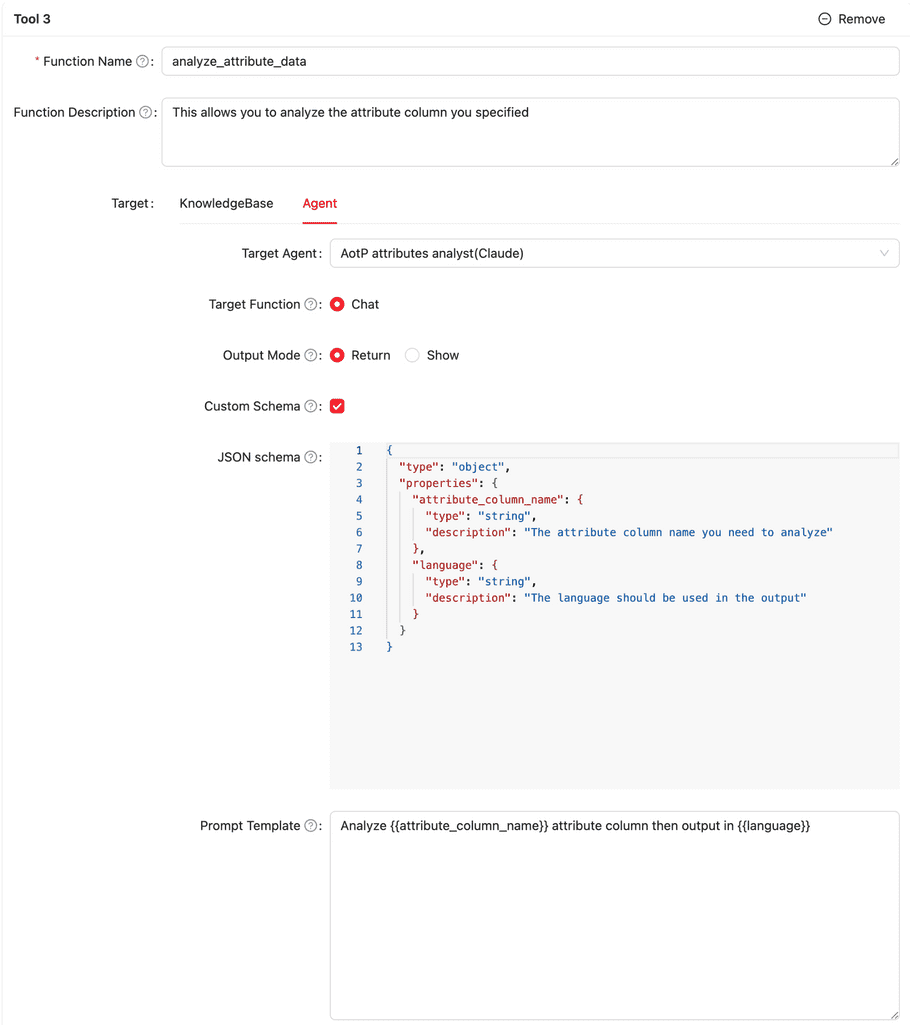
| Custom Schema | You can design the input data schema for the selected agent. When you check this item, two new fields named JSON schema and Prompt Template will display. You need to define both fields. For the JSON schema field, you need to define the schema using JSON Schema. For the Prompt Template, you can use the {{param}} style format to define. The parameters must be defined in the JSON Schema field. |
The screenshots below are examples for Target: KnowlegeBase and Target: Agent.
Defining Outputs
| Field Name | Description |
|---|---|
| Name | The name of this output. :plotly: is the special reserved name defined in the system. If the output has this name, the output is called when drawing the chart to generate a chart configuration for plotly.js. Plotly.js is the only supported chart lib. This is a temporary solution and might be changed in the future. |
| Function Name | The name that is referred from the agent(system prompt) |
| Function Description | A detailed explanation of this tool |
| JSON Schema | The object schema design for this output. Use JSON Schema to define this definition |
The screenshot below is an example of the output.
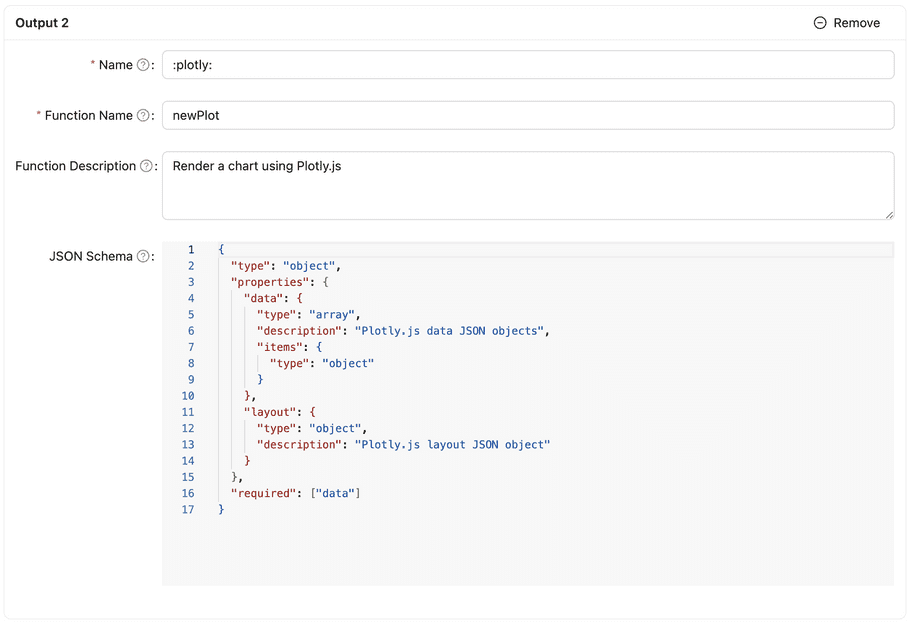
Special output function name :plotly:
As describe previously, “:plotly” is the special output function name; you don’t need to consider the schema, just use the following code.
You can modify some for your agent to output a better configuration.
Name: :plotly:
Function Name: newPlot
Function Description: Render a chart using Plotly.js
JSON Schema:
{
 "type": "object",
 "properties": {
   "data": {
     "type": "array",
     "description": "Plotly.js data JSON objects",
     "items": {
       "type": "object"
     }
   },
   "layout": {
     "type": "object",
     "description": "Plotly.js layout JSON object"
   }
 },
 "required": ["data"]
}
Prompts
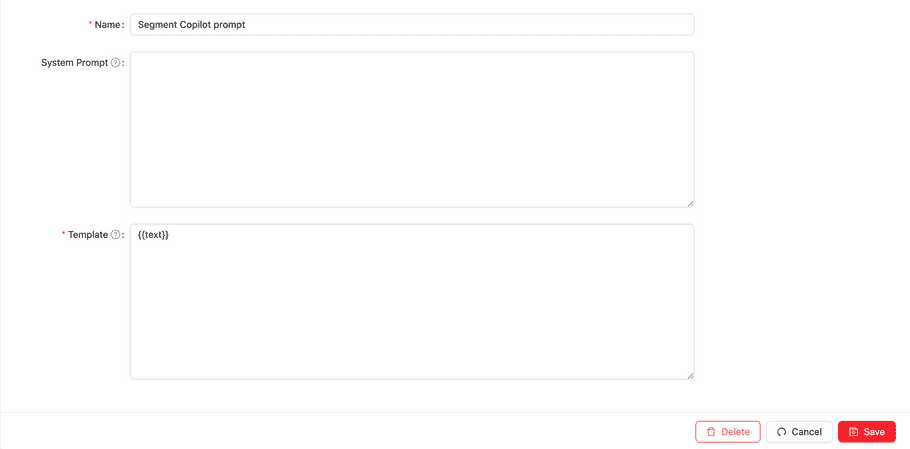
To make the Agent available, you need to define the Prompt, which is the object that the client talks to. A prompt has four fields: name, Agent, system prompt, and template. The Agent is the underlying Agent for the Prompt. The System prompt field is the Prompt that extends the system prompt defined in the selected Agent. The Template field specifies the text with parameters that are passed to the AI Framework, which will be the first user input to the Agent. Prompts need to be used with Integrations.
Configuration
| Field Name | Description | |
|---|---|---|
| Name | The name of this Prompt | |
| Agent | The Agent that the user input will be passed. | |
| System Prompt | Texts that will be combined with the system prompt defined in the selected Agent. You can use this parameter to customize the system prompt of the agent. | |
| Template | A templatized text for the FIRST user input for this action. Use {{parameter}} notation for defining parameters. The parameters defined in the template must be given by the client. You can define several parameters in the template. |
With the template below, the client must call the API with the “email” parameter. If the client calls this action with {“email”: “jonsie@abc.com”}, the first user input text will be “Summarize the data of the person whose email is jonsiea@abc.com”
Summarize the data of the person whose email is {{email}}
If the template is similar to the following example, the client can give the whole text as a message.
{{text}} |
Chats
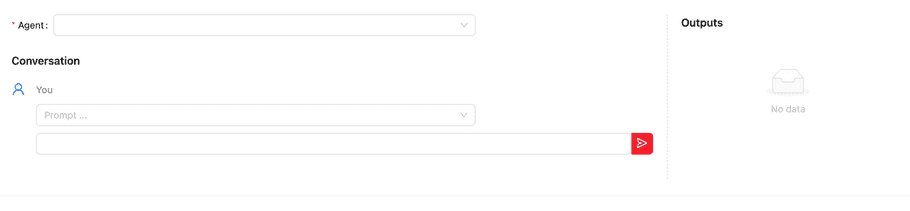
A chat allows you to converse with your agent through prompts. To start a new chat, you need to select the “Chat” button (conversation icon) of each agent or prompt. You must chose both agent and prompt in the new chat view to start the conversation.
Below is the screen shot of the beginning of the chat. You must chose the Agent first to start the conversation. Prompt (the field with placeholder text Prompt…) is optional, you can keep it empty to start a chat.
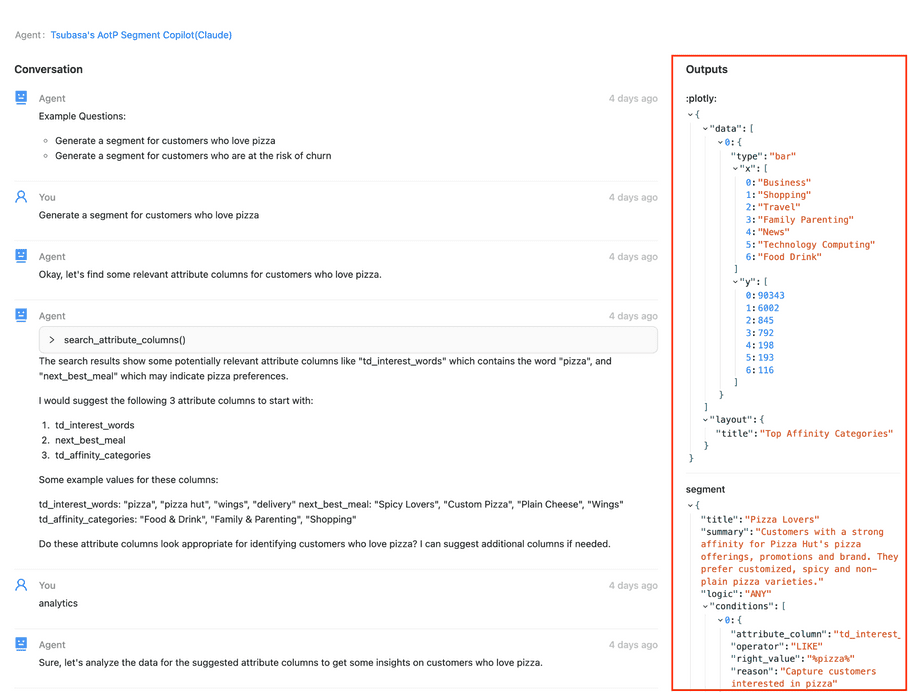
The following is a screenshot of the chat with some conversations. Outputs, the right panel, shows the last output object of each output function called.
Integrations
The integration object is the configuration of making prompts called from a specific service in the TD Console and also outside of the TD (Webhook, Slack).
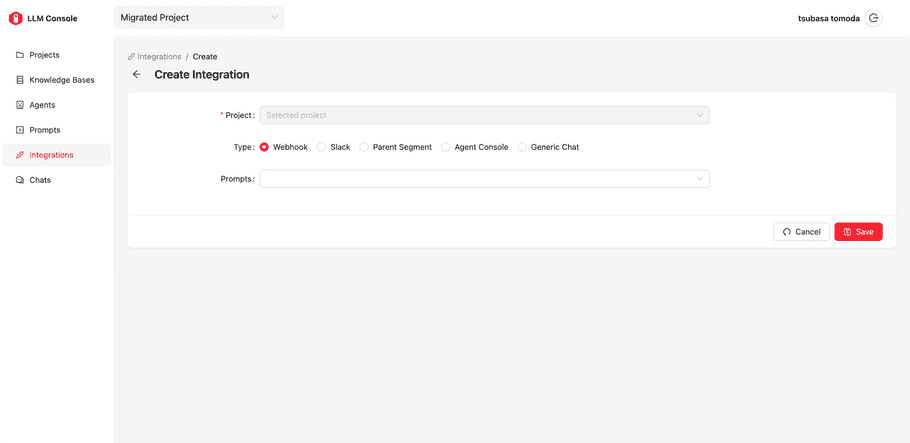
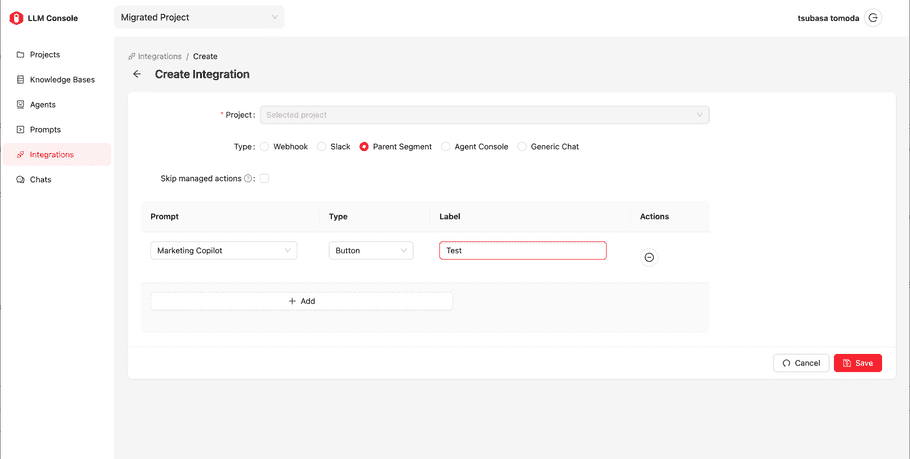
Configuration
| Field Name | Description |
|---|---|
| Type | Where the Prompt will be called: Webhook, Slack, Parent Segment, Agent Console, and Generic Chat. |
| Prompts | Multiple prompts can be chosen. For Webhook and Slack, it requires selecting prompts. But for others, they require a set of a Prompt objects: a type and a label. Type is “button” or “text input”, which will be used how it’s rendered in the corresponding UI. |
| Skip managed Actions | If this option is enabled, the default actions provided by TD will be ignored in the corresponding UI (If it’s Marketing Copilot, the default actions “Suggest questions” and “Get an overview” will be ignored and only user defined ones will be displayed. |
How to call action via Webhook
You must create an integration object with a Webhook type to enable Webhook. Navigate to the View page of created integrations, and select the Show button under “Webhook authorization information” at the bottom. Then, you can find a token for this integration. The URL is generated for each prompt you choose in its integration.
On the client side, with this authentication token, the POST API endpoint has the parameters you defined. You can get the result object if you specify the “application/json” content type. The example code on the client side is as follows. It contains the code for Google Spreadsheet (Google Apps Script) to get the list of data that meets the user’s request and shows the list in the sheet.
function onOpen() {
const ui = SpreadsheetApp.getUi();
const menu = ui.createMenu('Treasure AI');
menu.addItem('Get Customers List', 'getCustomerList');
menu.addToUi();
}
function getCustomerList () {
const endpoint = <endpoint>;
const auth = '<token>';
const cell = SpreadsheetApp.getCurrentCell();
const text = cell.getValue();
const resp = UrlFetchApp.fetch(endpoint, {
method: 'post',
contentType: 'application/json',
payload: JSON.stringify({text}),
headers: {
"Authorization": auth
}
});
const resObj = resp.getContentText();
const customersObj = JSON.parse(resObj);
const customers = customersObj.customers_list.list;
const results = customers.map(customer =>
{
return Object.values(customer)
}
)
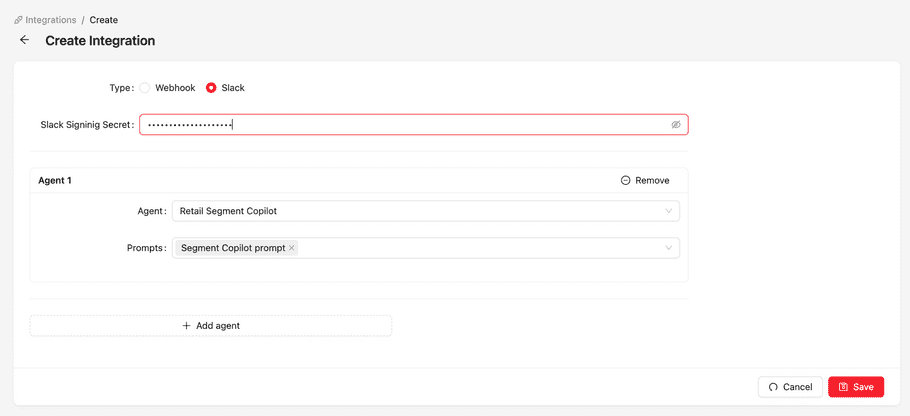
}How to call action via Slack
To enable a Slack integration, you must create an integration object with a Slack type. Navigate to the view page of the created integration. Prior to creating a Slack type integration, from your Slack accout, you must identify the “Slack signing secret”.
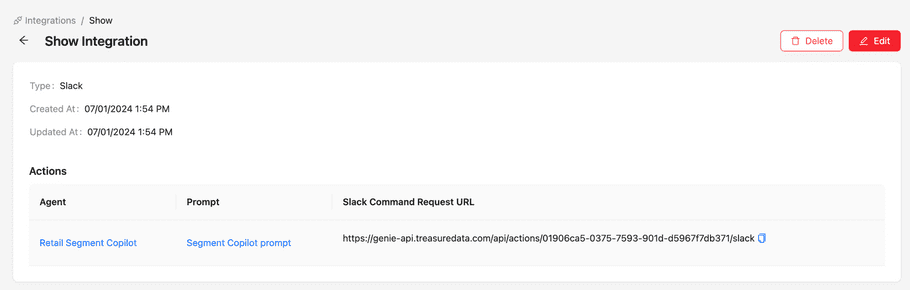
Same as the Webhook type integration, you can find the URL for Slack (Slack Command Request URL) in the view page of its integration.
Marketing Copilot Customization
Default Marketing Copilot
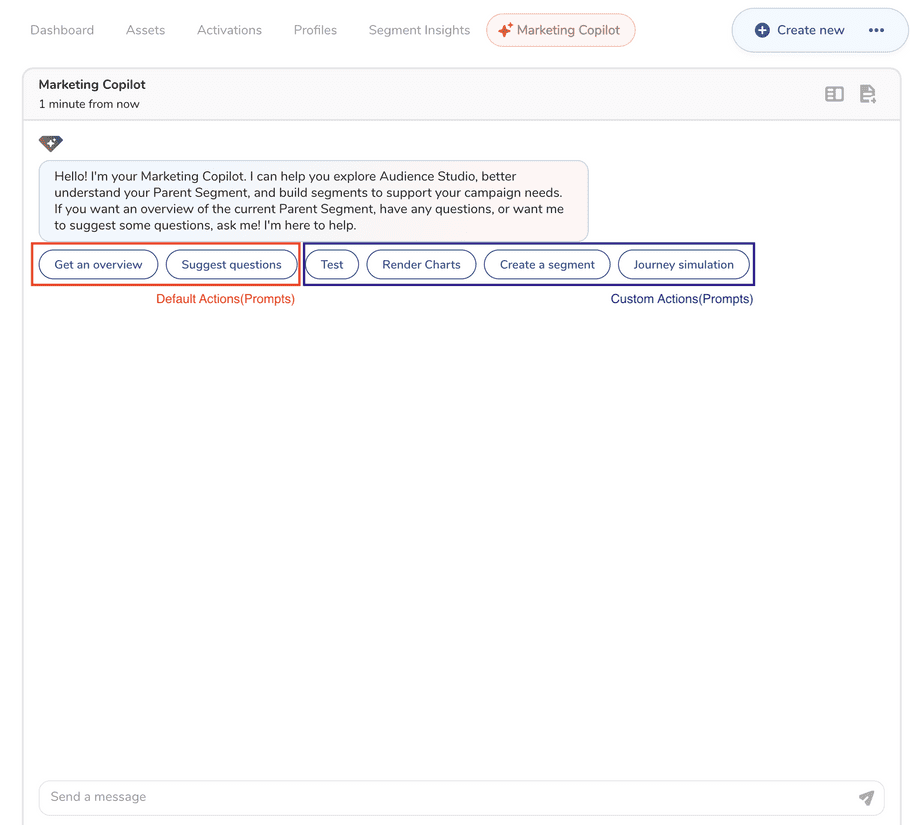
From an AI Framework perspective, Marketing Copilot is a capability that enables agents in the Audience Studio parent segment folder. Prompts set up in a "Parent Segment" type Integration will be shown in the chatbox in the Audience Studio parent segment folder.
As described in the Project section, there are two types of assets: one is managed, and another is non-managed (custom or "self-defined.") Managed assets are assets provided by TD. Users can't create, read, update, or delete the TD assets. To provide default functionality for the Marketing Copilot, when the LLM capability is enabled for a particular parent segment, the system automatically creates a corresponding managed project and managed knowledge base, agents, prompts (for two bubbles and one text input), and integration (parent segment type.) These auto-generated prompts will be displayed in the chatbox.
Customization
By adding a new parent segment type integration, you can customize the Marketing Copilot.
Adding bubbles
When you create a parent segment type integration specifying custom prompts with a button type, those prompts will be added next to the default managed prompts.
In the Chatbox
Overwriting default prompts
If you create a parent segment type integration with some prompts, but you turned “Skip managed actions." The default prompts provided by TD will not be shown in the chatbox; only prompts configured in the integration will be shown.